

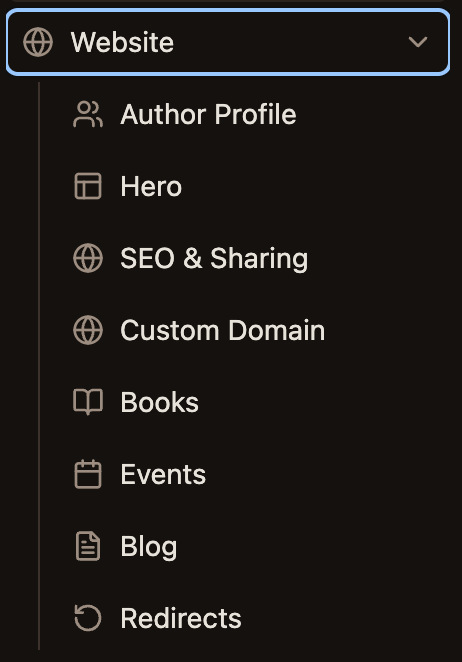
Step 1. Author Profile
This section is where you introduce yourself to readers, upload your author headshot, and write your bio. You can also add your social media links, include a “Featured” section (if you’ve done interviews or been featured anywhere), and create custom call-to-action buttons — like a direct “Buy my books here!” button. If you’ve ever used Linktree, you will have absolutely no problem adding your links! Just paste the URL, type your custom text, and you’re done. You will also see a field for a slug. If you aren’t familiar with the term, a slug is simply the very last part of a web address that identifies a specific page. Your slug should ideally just be your name/pen name, e.g., _firstname-lastname. _ Another important feature to know about in this section is the top navigation menu.
Step 2. Hero
The “Hero” section is the very first thing visitors see at the top of your homepage. We made yours incredibly flexible so it can easily change whenever your goals change. Sometimes you might want to use it to promote a new book release, link to ARC sign-ups, or an upcoming event. But if you aren’t sure yet, that is completely fine! It is perfectly okay to leave it set to “no objective” while you focus on setting up the rest of your site. → Author ProfileStep 3. SEO & Sharing
We highly recommend filling out this section because it directly impacts how your website ranks in search engines. You want your site to appear near the top when someone googles your name or your specific niche, right? SEO Title: This is the headline that search engines display in their results. Instead of just putting your name, add a punchy hook. For example: Jane Doe | Best-Selling Author of Gothic Horror. SEO Description: This is the short snippet of text that appears beneath your title in search results. Keep it engaging and targeted to your ideal reader. For example: Jane Doe writes folklore-rooted fantasy and supernatural thrillers that will completely immerse you in dark, atmospheric worlds. → Website ThemeStep 4. Custom Domain
While your site works perfectly on a default URL (likecabinspress.com/your-name), getting a custom domain will definitely make your website appear more professional. You can purchase your custom domain through a provider like GoDaddy, and then simply insert it here in the Custom Domain tab to link it directly to your CabinsPress site.
→ Per-Book Website Settings · Public Book Page
Step 5. Books
If you want any of your books to appear on your website, you first need to add them through the My Books section located at the very top of your main dashboard. This is where you will input all of your book’s core information, including the synopsis, cover art, and publishing dates. Once added, they will appear here in your website settings, where they will be marked as Published, Coming Soon, or Unlisted. If you ever want to temporarily remove a book from your live website, you can easily jump in and change its status to unlisted. Please note that this section merely allows you to feature your books on your website pages. To actually sell them directly to readers, you will use the E-commerce section of the top menu to set up your personal shop. ADD LINK TO E-COMMERCE ARTICLEStep 6. Events
Even though many of us are introverts, author events are simply a part of life. Fortunately, adding them to your website to keep your readers updated is super easy!Just give the event a title, tell us when and where it is, insert a relevant link, and you’re done. Best of all, you don’t have to worry about cleaning up old listings later — once an event passes, it will automatically remove itself from your website. → SEO & Social Sharing · Custom Domain · URL Redirects
Step 7. Blog
Write updates, share behind-the-scenes writing progress, or post book announcements directly through this text-based editor without ever needing a third-party blogging platform.Step 8. Redirects
If you are moving over from an old website platform, you won’t have to worry about broken links. The Redirects tool allows you to safely forward old URLs to your new CabinsPress pages, ensuring a seamless experience for your existing readers and keeping your search rankings intact. Once your toggles are on and your content is configured, here’s the public experience:- Author Homepage — hero with portrait, bio, and CTAs; published works; upcoming events; featured press; footer with social links, contact, mailing list signup, and blog link
- Public Blog Index and Public Blog Post Page — searchable archive with tag filters
- Public Events Listing and Event Detail Page — searchable upcoming events with local times
Your shop, ARC signup pages, and mailing list signup are covered in their own sections — the website builder connects them into one cohesive author presence.
Next steps
This section is where you introduce yourself to readers, upload your author headshot, and write your bio. You can also add your social media links, include a “Featured” section (if you’ve done interviews or been featured anywhere), and create custom call-to-action buttons — like a direct “Buy my books here!” button. If you’ve ever used Linktree, you will have absolutely no problem adding your links! Just paste the URL, type your custom text, and you’re done. You will also see a field for a slug. If you aren’t familiar with the term, a slug is simply the very last part of a web address that identifies a specific page. Your slug should ideally just be your name/pen name, e.g., _firstname-lastname. _ Another important feature to know about in this section is the top navigation menu.Step 2. Hero
The “Hero” section is the very first thing visitors see at the top of your homepage. We made yours incredibly flexible so it can easily change whenever your goals change. Sometimes you might want to use it to promote a new book release, link to ARC sign-ups, or an upcoming event. But if you aren’t sure yet, that is completely fine! It is perfectly okay to leave it set to “no objective” while you focus on setting up the rest of your site.Step 3. SEO & Sharing
We highly recommend filling out this section because it directly impacts how your website ranks in search engines. You want your site to appear near the top when someone googles your name or your specific niche, right? SEO Title: This is the headline that search engines display in their results. Instead of just putting your name, add a punchy hook. For example: Jane Doe | Best-Selling Author of Gothic Horror. SEO Description: This is the short snippet of text that appears beneath your title in search results. Keep it engaging and targeted to your ideal reader. For example: Jane Doe writes folklore-rooted fantasy and supernatural thrillers that will completely immerse you in dark, atmospheric worlds.Step 4. Custom Domain
While your site works perfectly on a default URL (likecabinspress.com/your-name), getting a custom domain will definitely make your website appear more professional. You can purchase your custom domain through a provider like GoDaddy, and then simply insert it here in the Custom Domain tab to link it directly to your CabinsPress site.
→ Per-Book Website Settings · Public Book Page
Step 5. Books
If you want any of your books to appear on your website, you first need to add them through the My Books section located at the very top of your main dashboard. This is where you will input all of your book’s core information, including the synopsis, cover art, and publishing dates. Once added, they will appear here in your website settings, where they will be marked as Published, Coming Soon, or Unlisted. If you ever want to temporarily remove a book from your live website, you can easily jump in and change its status to unlisted. Please note that this section merely allows you to feature your books on your website pages. To actually sell them directly to readers, you will use the E-commerce section of the top menu to set up your personal shop. ADD LINK TO E-COMMERCE ARTICLEStep 6. Events
Even though many of us are introverts, author events are simply a part of life. Fortunately, adding them to your website to keep your readers updated is super easy!Just give the event a title, tell us when and where it is, insert a relevant link, and you’re done. Best of all, you don’t have to worry about cleaning up old listings later — once an event passes, it will automatically remove itself from your website.
Step 7. Blog
Write updates, share behind-the-scenes writing progress, or post book announcements directly through this text-based editor without ever needing a third-party blogging platform.Step 8. Redirects
If you are moving over from an old website platform, you won’t have to worry about broken links. The Redirects tool allows you to safely forward old URLs to your new CabinsPress pages, ensuring a seamless experience for your existing readers and keeping your search rankings intact. Once your toggles are on and your content is configured, here’s the public experience:- Author Homepage — hero with portrait, bio, and CTAs; published works; upcoming events; featured press; footer with social links, contact, mailing list signup, and blog link
- Public Blog Index and Public Blog Post Page — searchable archive with tag filters
- Public Events Listing and Event Detail Page — searchable upcoming events with local times